Showing posts with label Tutorial. Show all posts

Sunday, January 8, 2012

Adventures in Sewing: Episode 1 ~ Inital Taggie

So if you recall I was recently given a Singer Sewing Machine so that I could practice one of my new hobbies :)
I wanted to make something special for my new Nephew but couldn't decide what to do until I was looking through some of the 2E's baby photos and noticed their taggie blankets. Both kiddos always loved their taggies so I knew this would be the perfect thing for my first project. However, Me being Me, I wanted to put another spin on things so I decided to do an initial instead of a plain old square.

Since this was my first project of this type there was lots of trial and error to say the least haha but hopefully this little tutorial makes sense.


Initial Taggie 

Materials:
  • Colorful Fabric
  • Ribbon is various colors, widths, textures.

Step 1: Decide how large you want the letter to be. 
Step 2: Choose your font in a Word program, print it, and cut it out.
(I free handed mine because I was too impatient to wait for my new ink to arrive so please ignore the pencil marks)

Step 3: Place two pieces of fabric face to face and pin the cut out letter where you want it on the fabric.
Step 4: Cut out the letter leaving a 1/4 inch or so extra fabric around the letter.


Step 5: Cut ribbon into 4-5 inch lengths. *Sorry I forgot to snap a pic when the ribbons were piled up :-/
Step 6: Fold ribbons in half and pin around the edge of the face of one of the cutout letters.


Step 7: Place letters face to face again and pin in place.
Note: I removed my ribbon pins at this point simply because I only had long ones and was running out of room haha


Step 8: Sew around the outside of the letter and leave a 1.5 inch wide space for turning.


Step 9: Unpin and turn inside out.
Step 10: Top Stitch place you use to turn inside out to finish the letter.


Final Step: Ohh & Ahhhh and be very impatient until you can give to Little Mr.Adorable for whom you made it. :) :)


It may not be perfect, I won't point out the mistakes, but I am happy with it and as soon as I get a pic with Zach and his taggie I will share it.
I do believe I am going to LOVE this new sewing hobby plus I feel pretty good at already working on one of my resolutions with it only being 8 days into the New Year :) :)

How are you going on your resolutions or changes so far?

Tuesday, March 15, 2011

Tuesday Tutorial Shares

While I myself have been totally uncreative this past week, thankfully others have been completely crafty. That makes me happy for two reasons. 1 - so that I can delight in their craftiness and 2 - so that I can share that wonderful delight with you!

Here are a few of the lovelies that I can't wait to try myself!


-- DIY Jars from Krystina @  Lollipops 
-- Garden Seat Makeover from Myra @ The Casabella Project
-- Candlestick Love from Amy @ Just Pleased as Punch
-- Drop Cloth Painting(not finished yet but WOW) from Suesan @ Frou-Fru Gal

A few more...


-- Freezer Paper Stencil from Denise @ Pink Postcard 
-- Parker's New Table and Chair from Jen @ Scissors & Spatulas
-- Message Board from Susan @ HomeRoad
-- Mambo Number "5" from Lisa @ 504 Main

I hope you enjoy these beauties as much as I have! Some of these blogs are new to me and I am looking forward to checking those out more this evening.

Have you been fortunate to come across a new blog or two that you simply adore? If so I would love for you to share the link with me!


Thanks to everyone who sent Ms.Emma well wishes last week when she was under the weather. Thankfully she is back to her regular awesome self now. I think it helped that on Sunday she came home from my Mom's with a new dog -- a little Chihuahua named Max. She has wanted one for so long, so needless to say she is a happy camper! 
 
Meet Max

Monday, February 28, 2011

Plain to Pretty : Ikea Billy Bookend Makeover

A few weeks ago I had my Ikea Initiation and I am working on my "want" list for the next time we go. :) One of the things I picked up was a Billy "B" Bookend. The one I got was a cream color and I am just a fan of cream as it simply does not work in our home so  I made a few changes.

Billy Bookend Makeover Tutorial

Supplies:
Spray Paint
Rub-ons 
Popsicle Stick


Paint letter in your color choice.

 Pick out Rub-ons to apply

Apply rub-ons in a scattered design

 Finished Product: Patterned and Pretty!


Do you shop at Ikea? What is your favorite purchase??


I am sharing this Makeover at the following Linky Parties
-be sure to go check out all the fabulous talent!


Making
Sumo Sweet Stuff


Becolorful


Tip Junkie handmade projects

Thursday, February 24, 2011

Book Leaves - A Tutorial

During these final(I hope) days of Winter I wanted something that would bring a little life into a room. While I love plants they always seem to meet an untimely death in our house so I need something that looks nice but is already DOA.
I decided since I have an abundance of twigs here up on the Mountain and I have a multitude of books laying around I figure why not put them all to good use.

Book Leaves: How-To

Supplies:
Twigs of various lengths
An old book
Scissors
Glue


Cut out oval leaf shapes - I cut 3 different sizes.


 Apply small dab of glue to one end of a leaf


 Attach leaves to each end of the twigs.


 Put as many or as few as you would like.


Loving how this looks and can not wait to do lots more to put in a taller container!

Thanks to Heather @ twentysomething for letting me take some photos at her house :)

Now I am onto my next project which is a biggie and has some things are a whole new world for me. Needless to say I am nervous and excited at the same time!
What have you made this week?


Linking to the following parties -- go by and check out all the fabulous links!
Linking this up to the following Parties - go by and check them out!
giveaways 
HookingupwithHoH


Transformation Thursday
Show and Tell Green


Weekend Bloggy Reading

Wednesday, February 16, 2011

Scattered No Longer

It has come to my attention that I have a bad habit of not taking off my jewelry when I go to bed. The reason I have deemed this a bad habit is because a few hours later I will wake-up with a necklace(or two) all tangled in my hair, or a scratch on my face from the bracelet I left on. When this happens I tend to untangle myself, take off said pieces of jewelry and toss them on my nightstand. The bad part, not worse than the tangles/scratches mind you, is that when my alarm goes off in the morning the jewelry gets scattered all over the place -- no fun finding it all again.

Due to this habit I have been on the lookout for something to hold my jewelry. Yes I have a jewelry box and even a necklace holder in the bathroom but for some reason I never take the pieces off when I am near them.

A few weeks ago MeganDVD @ BeautyintheAttempt posted her PB Knock-off  and it hit me -- that is what I need but a bowl!! --Thanks Girl!

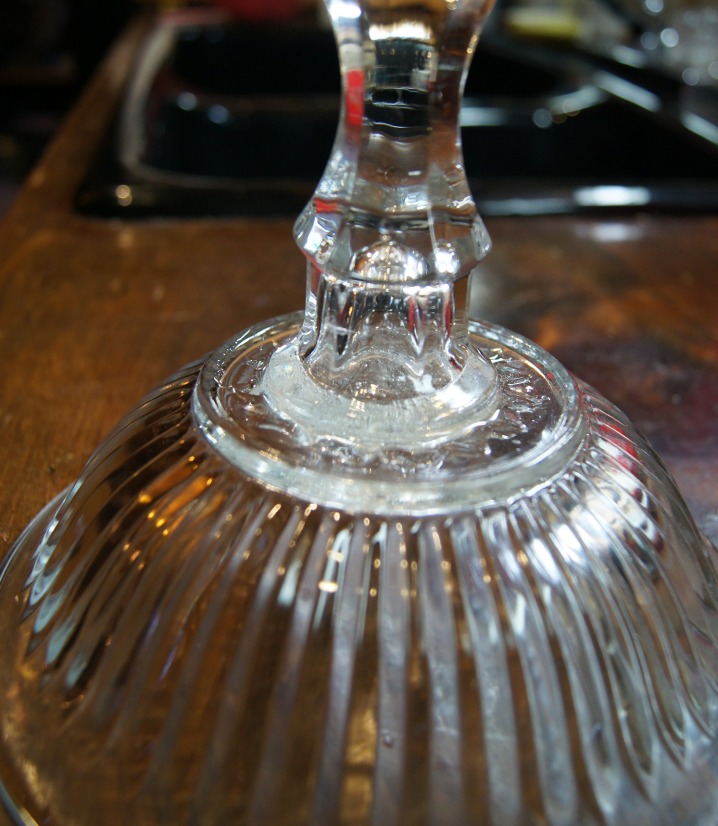
Since I was on my way to town I figured I might as well stop by the Dollar Tree and see if I could find what I needed for the project. -- They DID! $2.14 later I was ready to work!

Supplies:
1 - Glass Bowl $1.00
1 - Glass Candlestick $1.00
1 - Tube of Epoxy Free(The HandyMan already had it!)


Step 1: Invert the Glass Bowl as shown
Step 2: Use Epoxy as directed to the bottom of the bowl and a-fix candlestick(also inverted -- you never know)


Step 3: Let dry overnight
Step 4: -- there is NO Step 4! How easy is that?!? A 3-Step project!!

Now you can use your new glass bowl pedestal to hold whatever it is you need. Maybe some pretty soaps by the sink, your daughters hairbows, or like me -- jewelry on the nightstand.

For now I had a slight change of plans and mine is displaying the lovely seashells my son brought me from his field trip to Jekyll Island last week :)


Later it will look like this:


What is something you have made that helped you out recently?


Check out my Party People for Linky Love!

What am I working on next?

Sneak Peek


Thursday, February 3, 2011

DIY Apothecary Bottles

I have always had an affinity for old apothecary bottles. Something about imagining them lined up on the shop shelves always makes me smile. I am not sure why, I mean it's not like I have ever seen an actual Shop or anything, but all those different shaped and colored bottles always catch my eye.

*Sigh* -- HandyMan thinks I am nutty enough but imagine if I said I want to take a fieldtrip here!

We were at a roadside flea market recently and in the very first section I came across two old amber bottles. I went to get a better look and they were actually glass Lysol bottles. The vendor saw me checking them out and said "Those can be yours for $5.00 a piece." I sadly shook my head and said "Sorry I only have one dollar on me." He replied "Well I don't have one of those fancy money machine things so you can just have them both for your $1.00." Hellooo SCORE!! Plus, to make it even sweeter -- every other amber bottle of the same sizes that I saw that day was over $8.00 each!!

Once I got the bottles home they sat on our table while I decided what I wanted to do with them. Then today as I was finishing up The Apothecary's Daughter(appropriate right??!!) I knew exactly what I wanted to do.

------------------------------------
First I washed and dried the bottles. I adore that even though they are clean -- they still look awesomely old!!


Seriously -- a pretty LYSOL bottle?!? In--LOVE
Second I spent an hour a few minutes checking out all fabulous graphics over on The Graphics Fairy blog. If you have not visited her site then be sure to stop by. She has the BEST images anywhere and for any craft project or occasion.

Once I edited(I added some wording to both of them) and printed the ones I wanted I grabbed my trusty Mod-Podge and stuck those babies on the bottles.


I'm in loooveeee

The bottles turned out much better than I ever expected.  However every place I sat them in the house I was not happy with them so I did what any DIYer does -- I went out, gathered some twigs and stuck them in the bottles. Now no matter where I put them they have a unique look to them. :) *I am still on the look-out for some corks to fit them --hint hint H!*


BONUS: HandyMan likes them and was telling me to be on the lookout for all kinds of bottles.Then he mentioned that a glass display case would be a cool place once we acquired a few more. (Soon to be SCORE!) I see the beginnings of a new collection!

Linked Up Places
Check out all the fab projects!

What do you collect? Do you change the items at all or use as is? I'd love to hear about it.


Sidenote: If you have not read The Apothecary's Daughter by Julie Klassan I totally recommend it --Great book. Plus Amazon has the Free Kindle version -- SCORE!