Monday, January 31, 2011

Leftover Makeover

I am lucky to have a fabulous MIL and I am not shy about telling others this fact. I know that most MIL's get a bad rap but mine is simply fabulous and I am totally happy that I received her along with the one & only HandyMan when we got married :)

One of the many reasons I love her is that she is always on the lookout for "leftovers" for me. Whether it be leftovers from a neighbors yard sale or leftovers from someone moving out, she will call me and let me know what she has for me to look over before it goes to the dumpster. --Hellooo Say it with me .... Awesome MIL!!

A while back we went for Sunday night dinner at their place and she was like "Come look and see if there is anything in these boxes you want." I walked out on the back desk and there sat 4 huge boxes of stuff -- just stuff for me to rummage through at will and take whatever pieces I wanted. It seems her neighbor was doing a massive house cleaning and gave all the stuff to my MIL to simply HAVE! -- Wooahhh Nelly! This is not something that most people do these days so of course I was ecstatic!!

I found all sorts of things in those boxes. Some fabulous old wooden bowls(which I collect and could not believe someone didn't want!), a few pieces of costume jewelry, 2 antique wood sugar molds(again hellloooo?!?!?), some old records, 2 crock canisters and a bright orange watering can.

Needless to say it was a great evening for me :) I have a few things in mind for the pieces but today's post is what I did with the bright orange watering can.  I don't know about you but I am not a fan of most things bright orange. Now I know the orange road cones are needed but heck that color is simply not very appealing....but I digress.

-------------------------------------

Leftover Watering Can Makeover
Step 1. Take 1 metal watering can -- preferably in an unflattering color so Step 2 means more.
ACK
Step 2. Spray paint in your color choice - I chose Black Matte for mine.


Step 3. Let dry overnight.
While drying you can go ahead and pick out your rub-ons, vinyl lettering or paints. I chose rub-ons because I have an abundance from my scrapbook phase(which I seriously need to get back into).


Step 4. Apply lettering, phrases, etc to the watering can. 
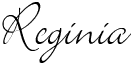
I applied our name then the rest randomly all around the can.


While I am not 100% over-the-moon for the "Boling Family" part...the rest I simply adore!

Materials:
  • Metal Watering Can
  • Paint
  • Lettering/Word/Symbol Options
So there you have it. 3 simple supplies to makeover an old tossed out watering can into a unique piece. I still have a little addition to add to this that will be posted later this week but for now I am happy with how it turned out!

BTW --- My 18th Wedding Anniversary is coming up in 20 short days so if any of you happen to run into The HandyMan please inform him that this camera bag would be the perfect gift! K?? Thanks so much!

I hope each of you have had a lovely Monday!


Linking Up to the following Parties :) :)

Making


Photobucket

Saturday, January 29, 2011

DIY Date Nite -- Sneak Peek

What do you get when two friends together who are aspiring DIY home decor gals, a few free hours, various tools, and some paint?

The Beginnings to 4 new projects!


This is just a sneak peek at some of the projects that Heather from TwentySomething and I worked on today.
The full posts will be available here and over here shortly - so be sure to check them out!!

Can't wait till Friday H!!!


Thursday, January 27, 2011

Tea and Cookies Please

 I will be the first to admit that even though my blog is about 3 years old I am actually a complete NEWBIE to the Blogging World. I am totally addicted to reading other blogs and seeing what kind of ideas others have. I have seen so many blogs that are absolutely stunning - either in the set-up, photos, or just plain awesomeness that makes me want to come back daily and read it. I am not saying that you may want to read my blog everyday, heck that would mean I would have to find time to post everyday first, but it would be lovely to have a nice one that makes a reader think to herself  "this is a place where I can hang out with a friend and have some tea and cookies" kinda blog. ;)

without the hats though


When I saw the blog critique offer I knew I wanted to be a part of it even though in the back of my mind I thought to myself --"Oh no what if no one likes me my blog, they may say mean things." Then I realized -- helloo this is not middle school(I hope) haha sooo I am totally open to all suggestions and comments to help me make my blog more Reader Friendly and FUN! :)


Below is the actual real BLURB about the blog hop -- which will help explain it better than I was able to above:
I am so excited to be part of a very unique blog hop. Gail @My Repurposed Life and MeganDVD @ Beauty in the Attempt are hosting “The Bold and the Beautiful-your blog reviewed”.

Please take a look around my blog, check out the layout, pages, buttons, sidebar and gadgets. I would love for you to gently critique my blog. I’m hoping you will leave me some positive feedback about my blog. It would be great if you could give me constructive criticism but be sure to tell me what you like about my blog too! Do you like my pictures? Does my blog load quickly for you? How about the font? All tips and tidbits welcome! 


Click above to join the party!


I am looking forward to hearing your thoughts -- I promise!

Sunday, January 23, 2011

R is for Recycle

It seems every store I go into these days or every catalog I get in the mail has some sort of initial display, wall hanging, accessory, etc. Whether it be one letter or a whole wall of letters like the photo below, letters are very popular! I am totally adoring the walls below :)
I am loving all the letters and symbols that I see!! I am not sure if it just goes along with my reading habit or what but I totally Love letters. It is not simply my own Initials I love - I love them ALL! The fact that this post features my own initial is purely circumstantial -- honestly ;)

I have seen quite a few people decorate letters in a number of different ways but my favorite has to be using torn book pages. Since I am an avid reader it seems I always have more than a few books laying around and as you know there are only so many times you can read the same book(unless it is reaaaalllyy good) so I like the idea of recycling them into other things.

Today I actually took some time to cover an R that I bought a few years ago so I thought I would share the How-To with you guys.

Book Page Monogram
Materials:
  • Letter of Choice - R found at a Flea Market for $.50
  • Old Book - I used two with different size font
  • Mod Podge
  • Paint Brush


The actual work is so easy that you could have your kids do it if you wanted. Just tear pieces of the book pages into all sorts of sizes and apply a small amount of Mod Podge to the back of the paper with the paint brush. Put the pieces on the letter/symbol, overlapping as you like to give it the decoupage look.


There is no rhyme or reason here, simply cover the whole letter with the paper.
Once the letter is completely covered in paper, let it dry then apply a few coats of Mod Podge to finish it off.(Let dry between coats)

Excuse the yellowed photo -- will take a better one tomorrow.

Hang or display in your house for everyone to Ohh &Ahhh over :)


I am now on the lookout for letters for everyone in the family along with some unique symbols.
Feel free to let me know if you see any I would like!


Linking to:

 Making

Friday, January 21, 2011

Emma's Bake Shop

Yes you are reading that correctly ~~ Emma's Bake Shop. One day you will see that sign hanging outside of an awning fronted window from which the smells of cake and all things yummy waft from.
For as long as I can recall Emma has had a love for baking. Heaven knows that is a trait that she did Not inherit from me. My fabulous MIL is a kitchen queen and the one thing she has always done with the kids go over there is bake something with Emma, usually some to-die-for chocolate chip cookies :)  Em graduated from the Easy Bake Oven to the real thing when she was about 8 years old and I do mean graduated. She wouldn't even let me help out in the kitchen when she was baking except for taking the pans out of the oven for her :-/ ~smart gal our Em!

She will get a notion, usually at around 9 o'clock or so to bake something. She will proceed to look up a recipe on the internet until she finds one that she likes(or that we have all the ingredients for). She will then whip up some yummy goodies for the rest of us to try. When asked what she is going to do when she grows up it has been the same answer for years -- "I am going to Art School then Culinary School so I can be a Baker(the art school will help with the decorating part)". I like that answer much better than the answer one of my friends got when she asked her son the same question. He wants to be a Garbage Man(no offense to Garbage Men :)

I must admit that it comes in handy when I am craving something sweet late in the evening. "Ohhh Emmmmaaaa" :)

Here are a few pics from tonight's cookie craving.


Mr. Handyman and I are looking forward to all the sampling we get to as she prepares for her future- not to mention all the free goodies will we have access to. :) :)

Did you become what you aspired to as a child?
What is something your children want to be when they grown up?

Our son says he is going to be a video game developer -- well I am here to tell you, he gets enough "research" in each day that he should have lots of success in that field ;)

Thursday, January 20, 2011

Treasure Hunting : Iron/Metal

One of the things I kept seeing on my trip down to Mart this week was Iron and Metal items. Whether it be a table or a bed, a lamp or a fan, almost every showroom I visited had some type of iron/metal pieces. The sad thing is the majority* of then were cheap reproductions that once in retail stores cost more than an original piece would -- so sad. *My fave showroom - Go Home has fabulous pieces!! I spent over an hour in their new showroom just looking around!

As I was checking out somethings in the WW of Craigslist today I thought I would see what iron and metal items I were listed -- you know, "just to see". It simply amazes me what some stores will sell knock-offs for when a little looking can get you the Real Thing at a much better price(and sometimes with a cool story to boot!)
*Click on Photos for more information*

#1- Iron Fireplace Surrounds
 
$50.00 - Great Price!

$250.00 - Has more detail
It is rare to find an actual Iron Surround these days as most are wood, however if you look you can find great vintage ones to use.

------------------------------------------------------------------

#2 - Old Metal Beds
$25.00 Each - Awesome Price as I see these(real vintage) for $150+ normally.
Some online searching found the two knock-offs below - the prices are the average for a full size.

------------------------------------------------------------------

#3 - Old Hand Water Pumps
Both for $60 (Fair price especially if the left one is as big as it looks)
These I found online but they have NO character at all! ;)

------------------------------------------------------------------

#4 - Railroad Cart: 
$250 - Fair price if really original.
It is easy to find the hardware so sadly the shops that sell them are reproducing but selling as original :(

------------------------------------------------------------------

#5 (my Fave Find today) Security Door
$150 -- Fab Price!!
Hard to find an antique door but the new ones(that look old) are between $500 -$900


These are just a few examples of real vintage pieces you can find with just a little looking. Heck sometimes you can find pieces that are completely Free* which is the best kind of deal there is!

*like the table I found for H - it is being delivered Saturday so I can't wait to see if it will fit :)

What are some things that you have seen in the stores/catalogs that you know you can find real ones of?

Tuesday, January 18, 2011

A Magical Repair and my 1st Sewing Project

For the longest time Since I got my camera for Christmas  I have wanted a cute camera strap cover. I spent a few days shopping around online for one but heavens-to-betsy they can be pricey! Cute, you betcha, but pricey. So then I proceeded to research how to make my own(because I am after all the Queen of Google hahaha). I found a great Tutorial online at Cluck Cluck Sew that looked fairly easy to follow. In no way am I efficient with a sewing machine, heck I can barely use a needle and thread, but I thought just maybe I can do this.
First things first though - I needed to dig out my ancient sewing machine. 


I was able to get the thread set-up correctly, the needle was a good one, and so I was ready to go.....until I mashed down on the pedal and nothing moved. The needle wasn't going up and down at all. I mean I know I am not a seamstress but even I know that the needle is supposed to move up and down when you mash the pedal. So I looked around the machine and noticed that the belt that made the needle go up and down(I am sure there is a more technical term for this but it slips my mind at the moment.) was BROKEN! Yep broke, and just like that all my hopes and dreams of sewing something fabulous went straight down the tubes :(

I was actually sad that I could not sew right then as I had gotten excited about it. About the time I was packing everything away my own Mr.Handyman came walking through the house and said "I can fix that for you." and he DID -- with a rubber bracelet! You know the kind that have a saying on them that you see everywhere. I still need to order a belt but that good ole rubber bracelet worked just fine so that I could make my camera strap!

DIY Sewing Machine Repair :)

                     --------------------------------------------------------

DIY Camera Strap Cover

Trust me when I say -If I can make this..anyone can!!
1. Stitched right sides together. Mine were a tad crooked as I can not draw a straight line much less sew one.
2 and 3. After about 3 more steps*see note - Turn ends over twice then stitch a few rows(again crooked). 
This will give the ends a nice clean look.
4. Tada ~~ End Result- I LOVE it!

There are a few things I need to work on, sewing straight is the 1st and then I think I will taper the ends of the next set for a snug-no slip fit. But I must say .. for my first attempt at this and really sewing something in general I am one happy gal at how it turned out :) I even told Mr. Handyman I was gonna make a manly cover too cause he likes to use my camera almost as much as I do.

Note: I have not mastered the art of taking a photo at every step of a How-to yet so that is why I say visit Cluck Cluck Sew for the Real Tutorial! 


Now I am on the lookout for what I can sew up next!
Do you have something that you have re-tried and loved lately?

Happy Sewing :)